• TPO roofing works best when the surface is clean, dry, and fully prepared before installation begins.
• Strong seams, tight edges, and careful detailing around openings are key to helping the roof hold up over time.
• A step-by-step approach can help avoid common DIY mistakes that lead to leaks, weak spots, and early roof failure.
Why TPO Roof Installation Needs Care
When a roof starts aging, small problems can grow fast and affect the whole building. In fall weather in Chicopee, MA, that matters even more because cooler air and changing conditions can make roof issues harder to ignore. If a flat roof is already showing wear, now is the right time to understand the TPO roofing installation process explained before damage spreads.
TPO roofing is a smart choice for many commercial buildings because it is made to handle daily exposure and changing weather. But the material only performs the way it should when the work is done with care from the start. Our team at commercial roofing services helps property owners make decisions that protect their building before small concerns become costly repairs.
A rushed install can leave weak spots, uneven seams, or drainage issues that shorten the life of the roof. That is why the process should be done step by step with close attention to the roof surface, layout, and sealing work. When we plan the job the right way, we help set the roof up for strong long-term performance.
How We Approach TPO Roofing Work
Every TPO roof starts with careful prep because the surface must be ready before the membrane goes down. We look at the deck, remove dirt and loose material, and make sure the base is dry and stable enough for the new system. If that part is skipped, the roof may not bond well and weak points can show up early.
From there, we focus on fit, fastening, and seam work so the membrane lays flat and stays secure. The edges, corners, and penetrations all need special care because those areas are often where leaks begin. The TPO roofing installation process explained is not just about placing a sheet on a roof, but about building a system that can hold up in real weather.
Step-by-Step TPO Roofing Installation
🧹 Step 1: Clean and Inspect the Roof Surface
We start by checking the roof deck for damage, trapped moisture, and loose debris. This matters because a clean, dry surface helps the new membrane sit correctly and bond the way it should. If the base is not ready, the rest of the install can fail early.
📋 Step 2: Measure and Plan the Layout
Next, we map out the roof so the membrane sections line up with as few seams as possible. Good planning helps reduce weak points and makes the finished roof easier to seal. This step also helps us work around vents, drains, and other roof details.
🔧 Step 3: Repair Any Weak Areas First
Before installing TPO, we fix damaged spots in the roof system that could cause problems later. This may include soft decking, open seams, or bad flashing near roof edges. Repairing those areas first gives the new membrane a stronger base.
📐 Step 4: Position the TPO Membrane
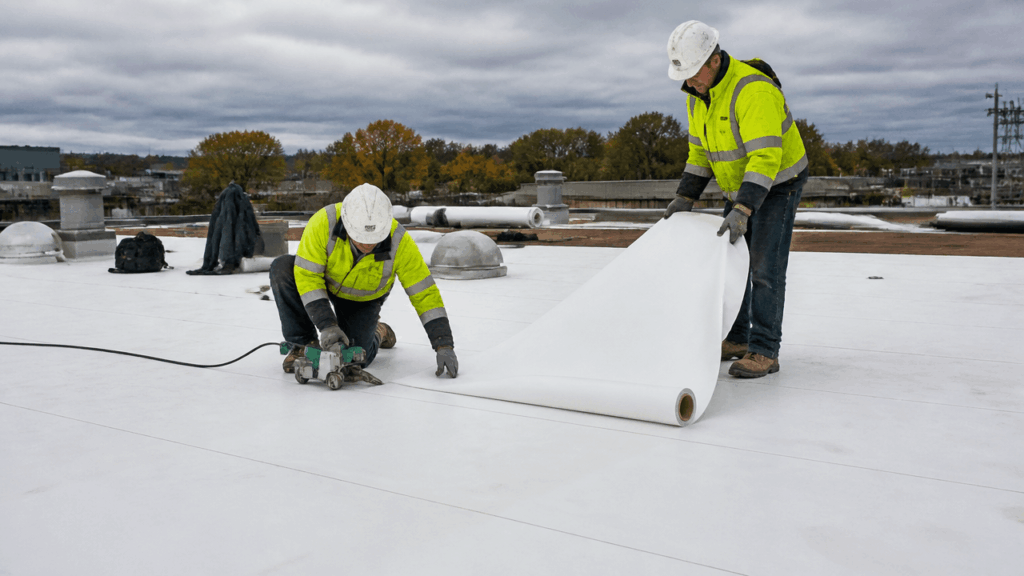
We roll out the membrane and set it in place so it covers the roof as planned. Proper placement is important because shifting or wrinkling can affect how the roof performs. A smooth layout also makes the next steps more secure.
🪛 Step 5: Fasten the Membrane Securely
After the membrane is positioned, it is fastened according to the roof system being used. The goal is to hold it tight without creating stress points that could lead to tearing. Secure fastening helps the roof stand up to wind and regular movement.
🔥 Step 6: Seal the Seams Carefully
We use heat welding on the seams so the membrane pieces bond together into one continuous layer. This part is one of the most important because poor seam work can lead to leaks. Strong seams help the roof stay watertight over time.
🧰 Step 7: Detail Around Edges and Penetrations
Next, we pay close attention to corners, drains, pipes, and other roof openings. These spots need tight sealing because water often finds the smallest gap first. Careful detailing helps protect the areas most likely to fail.
💧 Step 8: Check the Finished Roof for Problems
We finish by reviewing the roof for loose spots, uneven seams, and any places where water could collect. A final check helps catch small issues before they turn into bigger ones. That last look is a key part of a solid installation.
Common DIY Mistakes to Avoid
Many people think TPO work is only about rolling out material and sealing it in place, but the details matter much more than that. A DIY job often goes wrong when the installer skips prep, uses the wrong tools, or misses weak spots. Avoiding these errors can save time, money, and a lot of stress later.
⚠️ Mistake 1: Skipping Roof Prep
Some people rush straight to the membrane without cleaning or checking the roof first. That happens because prep work feels less important than the visible parts of the job, but it is often what decides whether the roof lasts. To prevent this, always inspect and clean the surface before any TPO goes down.
⚠️ Mistake 2: Ignoring Wet or Damaged Areas
A common mistake is covering up problems instead of repairing them first. This usually happens when someone wants to save time, but moisture or soft spots can weaken the whole system. The fix is to repair the roof base before starting the install.
⚠️ Mistake 3: Lining Up the Membrane Poorly
If the membrane is set down crooked or wrinkled, the finished roof can develop stress points. This often happens when the installer does not take time to plan the layout before fastening anything. Careful measuring and placement help avoid this problem.
⚠️ Mistake 4: Weak Seam Sealing
Poor seam work is one of the biggest risks in TPO roofing because water can get through even a small opening. This mistake often comes from using the wrong method or moving too quickly during the welding step. The best prevention is to seal each seam with patience and close attention.
⚠️ Mistake 5: Forgetting Edge and Penetration Details
Roof edges, drains, and pipe openings are easy to overlook during a DIY job. That usually happens because those areas take extra time, but they are also the places most likely to leak. To prevent trouble, inspect and seal every transition point before calling the job done.
Frequently Asked Questions
What is the TPO roofing installation process?
Yes, the TPO roofing installation process explained starts with roof prep, followed by membrane placement, fastening, seam sealing, and final inspection. Each step helps create a roof system that is secure and ready for weather exposure. Skipping any part of the process can shorten the roof’s life.
How long does TPO roof installation usually take?
Yes, the timeline depends on roof size, condition, and weather, but many projects move faster when the roof is in good shape. A simple roof can take less time than one that needs repairs before the membrane is installed. Careful planning helps keep the work on track.
Why is seam sealing so important in TPO roofing?
Yes, seam sealing is one of the most important parts of the job because it helps keep water out. TPO roofs rely on strong welded seams to form one continuous surface. If seams are weak, leaks can develop much sooner.
Can TPO roofing be installed in fall weather?
Yes, fall is a practical season for TPO roofing work in Chicopee, MA, as long as conditions are safe and dry enough for installation. Cooler weather can still support the process when the roof surface is prepared correctly. We always watch conditions closely so the materials perform as intended.
What makes a TPO roof perform well over time?
Yes, a TPO roof performs best when the install is done with proper prep, tight seams, and careful detail work at edges and openings. Regular attention after installation also helps protect the system from early wear. A roof built the right way from the start has a better chance of lasting longer.
Finish Strong With the Right Roof Plan
TPO roofing works best when every part of the process is handled with care from start to finish. When we focus on prep, layout, fastening, and sealing, we give the roof a much better chance to perform well through the season and beyond.
For property owners in Chicopee, MA, fall is a smart time to pay attention to roof condition before small issues turn into bigger ones. If you want to stay connected with our team, follow us on social media.